I have wanted to post about Home Canning Chicken since the blog began. However, because I didn’t take any good pictures this post will be more like a chat than a slide show. It is so simple that we really don’t need pictures….plus, pictures of chicken in boiling water are not very attractive.
Canning is so simple. My neighbor Bryn introduced me with peaches, then my friend Kirsten taught me to can salsa (do yourself a favor and make this-this summer.) She also taught me to pressure can, which is what we will be doing today.
Why would you want to can meat? The same reason you would make anything from scratch that you could buy at a store. You know what goes into it, and it is cheaper, and tastes better. That is more of a philosophical reason. For a super busy person, the practical answer is….you can make lunch and dinner quickly with this item in your pantry.
I like to use bone-in-skin-on chicken breasts. Nowadays, if I see it on sale for $0.99/lb I buy it up and can chicken (usually a summer holiday weekend). I simply toss as many breasts into a large stock pot and cover with water. Bring it to a boil and cook it about 2/3 of the way done. How do I know when it is 2/3 of the way done cooking you ask? Well, when you pull the meat off, the meat closest to the bone will still be raw.
Pull them out of the water, rip off the skin and pull the meat off of the bones. Best to let it cool down a little and you still might want to put on some clean dish gloves. Throw all the meat into a bowl. Put more breasts into the boiling water if you have more to cook. Repeat until all the breasts are cooked (2/3 of the way). Toss all the bones (sans skin) back into the pot of water to make a simple broth.
Take out the pieces of meat and start chopping. Cut the meat into bite-size pieces. Once the chicken is chopped your broth should be ready. Now it is time to can.
This meat will be pressure canned so we need to get the pressure canner ready. Put your canner on the stove with the recommended amount of water for your canner. I have a Presto Pressure Canner and I need 3 quarts of water. Let it come to a boil while you are preparing the jars.
Make sure you have hot,clean jars, lids (follow the directions on the box for preparing your lids), and rings. You may also want a funnel and a ladle. Because our meat and broth are hot, this will be a “hot pack” method. Pack your jars with the cut up chicken pieces but make sure you leave a generous 1-inch space between the chicken and the top of the jar (called “head space”). Once all the jars that can fit into your canner are filled, begin to ladle the chicken broth into the jars (leaving that 1-inch head space.)
Using a plastic utensil (plastic knife or spatula works) remove any air bubbles that might be in the jar. With chicken, I slide the plastic utensil down the inside of the jar and press toward the meat, all the way around. If the head space has increased, add more broth to bring it back to the 1-inch head space.
You will now wipe all the rims of the jars before you put the lids on. Because the breasts had skin on them, the broth can be greasy. Use vinegar (soaked into a clean washcloth or a paper towel) and clean those rims. Center the lids on the jar, and put the rings on to fingertip-tight.
Place jars into the pressure canner. Put the lid on locking it into place. You do not have the Pressure Regulator on at this point. As the water inside the canner comes to a boil, you will see steam shooting out of the vent pipe. I let mine vent for 10 minutes but you should follow the directions on your canner.
Once the venting is done, put the pressure regulator on and let it come up to 10 pounds of pressure. Adjust your burner temperature so that it maintains the 10 pounds of pressure. Pint jars of boneless chicken (what we are doing) will need to stay at 10 pounds of pressure for 75 minutes. Quart jars of the same will need 90 minutes at 10 pounds of pressure.
If the pressure drops below 10 pounds, you will need to restart your timer. I stay close by keeping an eye on it because I don’t want to restart the timer. Don’t want that chicken over cooked.
Once your timer goes off, turn the burner off and remove the pot from the stove. Allow the pressure to fall to zero all on its own. That can take a half of an hour or more depending on your canner. Once you take it off the stove you don’t have to watch it.
When the pressure is down to zero, wait a couple more minutes, then remove the lid allowing the steam to escape away from you.
I let my jars cool overnight, then I wipe them so any residue on the jar is removed and the jars don’t attract bugs in my pantry.
My favorite way to use this is in the winter for lunch. Before the summer is over, I’ll post about the garden veggie mix with chicken broth I can. Open a jar of chicken and a jar of veggie mix and a”Voila!” Home made chicken soup in just minutes.
You can also can turkey this way. More work, but when I qualify for a free turkey at Thanksgiving, canning is usually what I do with it.
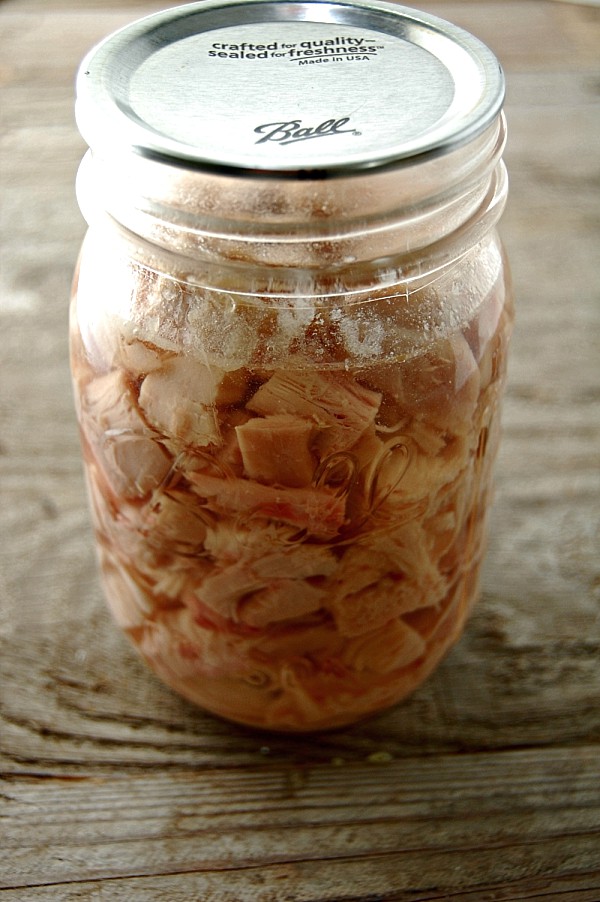
Here is a jar of the canned chicken. It might not be a pretty picture, but it sure is yummy.
Came via Food In Jars link and just spent the day reading from the beginning! Wow – you guys have been busy!
We are planning on moving to the country (probably north GA from central FL) now that we are retired and I was happy to read your adventure. I assume our adventure will be similar (except our kids are both close to 40 – maybe we can borrow the grandkids). We are planning for a large garden (eventually) as well as chickens (both layers and meat birds) then eventually expanding to include rabbits and goats. I’m sure it will be a process – start small & slow and add (or subtract) a bit each year.
In addition to all your general information I really appreciate your recipes as well as cider & soap making posts. Keep up the good work – both with your blog and with raising such wonderful boys!
Thank you! What lovely comments (especially about my wonderful boys). We have more to do but much less that NEEDS to be done. At the moment we are focusing on getting the goats pregnant. Looking at beef prices, I am looking forward to the time we can raise our own beef.
Best of luck to you on your new journey. You have the right idea…..start slow and add as time goes by.
Thanx for reading the WHOLE thing,
Karen
I can’t wait to try this. Not this year but next year when I convince my husband that we really need to get meat chickens. This fall/winter will have to be canned venison. Excellent blog, a bookmark for me for sure. Thanks a million!
When my tomatoes finally ripen, I will post the veggies in chicken broth. The two combined make such a delicious and healthy meal in a snap.
Thanx for checking out the blog,
Karen